by David McGuffin | Jul 17, 2013 | Destinations, Essential Travel Resources
PLACE SORBONNE – PARIS
Last Thursday morning, I walked out the doors of my Paris Sorbonne area hotel to temperatures in the 50’s F. With only one carry-on sized suitcase and a small drawstring backpack, the walk to the Luxembourg RER station was short and pleasant. The Paris Métro is infamous for its lack of elevators and escalators, so walking down the steps to the tracks was relatively easy with my light load. Catching the train at LUXEMBOURG was a good idea because this stop proceeds the busier two stops down the line (St. Michel and Châtelet les Halles). To make the trip even better, a local gentleman advised me to skip the first RER B train and take the next one because it was an “express” which skips all the stops north of Gare Du Nord. So, with my luggage stowed and a seat, I enjoyed a relatively stress-free 35 minute ride to the airport.
PARIS BY TRAIN BLOG
Doing my research, I ran across a blog by Ben Lam called http://parisbytrain.com. Ben does a nice job detailing the RER and Métro systems in and around Paris. From now on, I’ll go here first to seek answers to my Paris transportation questions.
by David McGuffin | Jun 16, 2013 | Essential Travel Resources
HAPPY FATHER’S DAY TO MY DAD!
Me and My Dad circa 1957
Today, I am in Paris showing my favorite city to several of my new found friends and travel partners. This morning, I’ve had a few minutes to reflect on just how I got the travel “bug” and what drives me to share my passion with others. I’d like to tell you about it…
My Dad (Don McGuffin) taught me at an early age to explore, to see what’s at the end of the road, and around the next corner. One of my earliest memories is staying at home with my Dad one day. I could not have been much older than 3 or 4 years. He was doing some work around the yard and gave me a screwdriver to keep me occupied. I reckon he said something like, “here, take this and go figure out something new.” With that new “toy” I explored a way to use it and gained a new experience as well. I wandered around to the backside of the car and took off the taillight cover, removed the bulbs, and was trying to figure out how to put it back together when my Dad found me. He took a photo of me and the taillight hanging by the wires, then we put it back together.
Later, I recall Daddy taking us on camping trips to the mountains. This was always an adventure to me and my family. I recall driving on dirt roads across the tops of mountains and Appalachian “Bald” hills just to see where the road took us. Often we discovered a new destination or scenic route. One time we took one of those roads and ended up in a rag-tag mountain “community” where everyone looked the same and stuck their heads out of their doors as we (the strangers) quickly tried to find a way out of this pre-“Deliverance” settlement.
I could go on and on with many stories of my travels and explorations with my Dad. They all end the same… we had an experience getting there and made a lifetime of good memories.
As it turns out, I am sure I would not be sitting here in Paris today had in not been for those early experiments, trials, errors, and adventures with my Dad. Thanks Daddy for showing me around and molding me into the man I am today!
HAPPY FATHER’S DAY!!
by David McGuffin | May 19, 2013 | Essential Travel Resources
Traveling without electronics is near impossible in today’s world. Twenty years ago, the only travel concern relating to electricity was how to plug in a blow dryer or curling iron without causing a meltdown. But not today, just think of all the gadgets we have: cell phones, mp3 players, laptop computers, tablet computers, video cameras, digital cameras, and more. With all these electronic gadgets, it would seem that travel would become more complicated, “electronically” speaking. However, it’s not that difficult… here are my hints and suggestions.
YOU’VE GOT TO PLUG IT IN!
No matter what the gadget, you’ve got to plug it in to something. Here at home, that would be a socket in the wall.
So, logically, anywhere there is electricity, we expect to find some sort of socket in the wall in which to plug our stuff. However, the design of the socket is not universal! Practically, every country has its own modification of the basic design.
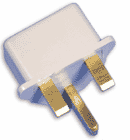
Notice how this socket is recessed/inset about one inch. It is important to purchase an adapter such as the one pictured to your left, so it will fit inside the recessed hole.
Typical UK and Ireland wall socket
Notice the two toggle switches? The outlet will not have power until the toggle switch is turned on. This is usually indicated by a red light on the top of the switch. However, if you find your appliance is not working, and there is no indicator light, consider toggling the switch and try again.
VOLTAGE MATTERS
Originally, electricity was used for lighting, and depending on the country, the best suited material for the wiring differed according to what was readily available. So, the United States agreed on a standard of about 110 volts AC. Meanwhile, in Europe, they agreed on a standard of around 220 volts AC.
Originally, appliances designed in Europe would work only in Europe. Those designed in the USA, only worked in the USA. You could not “mix” voltage. That’s why the sockets and plugs differ. You’ve heard the saying, “you can’t put a square plug into a round hole?” So, this was an easy way to keep “dummies” from plugging in mismatched devices and melting down appliances when visiting countries other than their own.
Plugs made for USA appliances and electronics.
Plugs made for UK (England, Scotland, Wales, Northern Ireland) and Ireland appliances and electronics.
So, when traveling from one country to another became common, not having “common” standards of electricity became a common problem for common people. Thus, the invention of the wall socket/plug ADAPTER and the VOLTAGE CONVERTER. With these two gadgets, theoretically, anyone could travel from one country to the other and never have to worry about electrical problems with their gadgets.
However, the best intended plans never seem to work all the time. I recall traveling on several occasions when suddenly the lights would dim and go out in our hotel. All too often it was a combination of someone trying to use their own USA hairdryer, it overheating, and blowing a fuse or circuit.
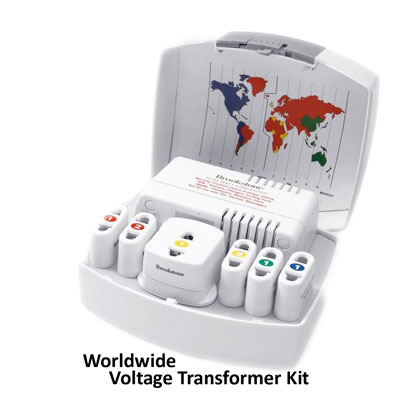
If you bring a curling iron, flat iron, straightener, or hair dryer from home (USA), you will need to purchase an electrical power converter and wall socket adapters. In theory, these electrical power converters step down the 240 volt power used in Europe to the 120 volts we use in the USA. These devices work most of the time, however, using them in older buildings with antique wiring will sometimes still cause a meltdown of your appliance or even “blow” a circuit or fuse in the building.
Voltage Converter with adapters
MODERN ELECTRONIC GADGETS
Practically every electronic gadget manufactured in the last ten years is designed, from the factory, to operate on multiple voltages. Cell phones, computers, iPads, tablets, digital cameras, and camcorders will recognize and adapt to the voltage in which it is plugged… without damaging the gadget. However, just to be sure, always look at the device’s power cord, power supply, or documentation for a statement similar to that shown below.
Notice the caption: “AC ADAPTER
INPUT 100v-240v – 50/60Hz
So, if your device falls into the category above (and it will if it is some sort of mobile electronic gadget or camera) all you need is an adapter to plug into the wall socket. Here are examples for the UK and Continental Europe.
UK (England, Scotland, Wales, Northern Ireland) and Ireland
SUGGESTION: Some Hair Dryers, Curling Irons, and Hair Straighteners are made to accept dual voltage. These generally have a small dial on the handle which can be rotated to select the appropriate electrical voltage. Often you can pick up this type of appliance at Walmart, Walgreens, Target, or other retail outlets.
So, there you have it… all you need to know to travel with electronics and not have a meltdown.
by David McGuffin | Apr 24, 2013 | Essential Travel Resources
Take a 60 second break from your routine!
My favorite alpine destination is the Lauterbrunnen Valley in Switzerland. You’ve got be trying to go there to get there. The pristine valley is located near the end of a road that dead ends into a glacier. Lauterbrunnen is a bit off the beaten path to say the least.
My BEST OF GERMANY, AUSTRIA, SWITZERLAND, AND FRANCE tour makes a two- night stop here in this beautiful valley. It is like taking a day off from touring and provides a great opportunity to slow down and relax. There are many possible walks and hikes in the area. Most combine a series of mountain lifts, gondolas, railways, and trails. All trails are open to the public, even if there are fences. Just close the gate behind you so the cows won’t escape!
Enjoy the video!
David McGuffin
by David McGuffin | Feb 26, 2013 | Essential Travel Resources
by Audra Dupuis
My fist trip with David McGuffin’s Exploring Europe was a six-day trip to Ireland. When I found out that I had to pack in one little suitcase… I panicked. How on earth could I pack that many warm clothes in such a small space? After trial and error, reading blogs on packing, and talking to family members, I was finally packed. Since that first trip I have managed to take multiple trips of varying lengths, all with only one carry-on bag and a backpack, cute clothes and more then one pair of boots! How can this be done, you ask? I am here to tell you my secrets!
Packing Secrets…
First, ensure that your suitcase is the right size. For this trip your carry-on needs to be no larger than 22in x 16in x 9.5in. This includes the wheels, so don’t take the manufacturers word for it. Place your suitcase, wheels down, on a flat surface and measure ALL of it.
Second, pick out all of your clothes, shoes, and accessories for the trip. Make sure you pack layers, warm socks, and warm shoes. Running tennis shoes are not the warmest shoes, because they are designed to breathe. If they are all you own, then no problem, just pack some warm wool socks.
Third, put a third of it back. We are chronic over-packers, especially women. Put back the shoes that are cute, but not warm or comfy. Put back that “just in case” outfit. And for girls, all of your makeup should fit in one little sandwich baggie. Pick your favorite makeup look and only pack the stuff for that. Each hotel has a hair blow-dryer, you do not need to pack one.
Fourth, plan to wear the bulkiest things on the plane. Wear your biggest pair of shoes, your thickest scarf, maybe a sweater, and your coat onto the plane. You can remove these items as soon as you board, but doing this will free up space in your bag.
Fifth, roll your clothes and place them in gallon Ziploc bags. Push the air out of the bag as you close it. I like to put clothes in bags by outfit so my luggage is well organized and I don’t have to search for things.
Sixth, fill your bulky shoes, if they will not flattened, with socks or underwear. You want to use every available space!
Seventh, fill it up! Time to make it all fit. This may take more then one try. If it does not all fit, find something you can live without and leave it at home.
Below is my personal packing list. Feel free to change it, print it, and use it. If you don’t use my list, find a different one you do like. A list is the best way to ensure nothing gets left behind.
Audra Dupuis
audra@davidmcguffin.com
Packing List
On the Way
| |
Sun Glasses |
|
Book, downloaded on phone |
| |
Travel Journal |
|
Chapstick |
| |
Pen |
|
Camera |
| |
iPod |
|
Camera Charger |
| |
iPod charger |
|
Earplugs |
| |
|
|
|
Money and Documents
| |
Arrival and Departure Times |
|
Passport |
| |
Driver’s license |
|
Credit Card |
| |
Insurance Cards |
|
C.C., Freeze Number |
| |
Cash, US |
|
Cash, Euro |
Clothes
| |
Underwear |
|
Boots- black |
| |
Long underwear |
|
Tights |
| |
Socks |
|
Boots- brown |
| |
3 Sweaters |
|
Jeans |
| |
Skinny Jeans |
|
2 Long-sleeve shirts |
| |
Colored Shirt |
|
T-shirt |
| |
Dress |
|
PJs |
| |
Coat |
|
Scarf |
| |
SCHS Sweatshirt |
|
SCHS Long T-shirt |
| |
Khakis |
|
|
Toiletries
| |
Make-up |
|
Deodorant |
| |
Shampoo/ Conditioner |
|
Brush |
| |
Soap |
|
Lotion |
| |
Toothbrush/ paste |
|
Hair Stuff |
| |
Medicine |
|
|
Before we go
| |
Tell bank/ credit cards we are leaving |
|
|
Snacks